After winning the title of the World's Fastest LabVIEW Programmer at NI Week 2008 through 2014, and being challenged at additional venues along the way (I'm looking at you, Copenhagen!), I have decided to retire from the competition and allow someone new to claim the title at NI Week 2015. It feels right to go out on top with an undefeated record.
I've really enjoyed defending the title all these years, particularly because of how much it has allowed me to advance the use of Quick Drop to increase LabVIEW developer efficiency. I'm confident that whoever wins the NI Week 2015 competition will be a Quick Drop user.
Thanks to all of my opponents over the years for being such good sports, and good luck to whoever ends up competing for the title this year.
Thursday, February 5, 2015


Wednesday, October 8, 2014
Three Use Cases for LabVIEW Bookmarks
When LabVIEW 2013 released, I was really excited about LabVIEW Bookmarks. I've been using them for a year now, and I feel they are one of the most productivity-enhancing features in the whole product.
What are bookmarks? Any word preceded by a "#" symbol within a free label, object label, wire label, or subdiagram label on the block diagram. So they're super-easy to create (you just type!), and also very easy to manage with the View > Bookmark Manager window. And my favorite (often-overlooked) aspect of the Bookmark Manager is that it will parse all of the VIs in your project for bookmarks, even VIs that are not in memory! In my opinion, that's the primary benefit that the Bookmark Manager provides over the standard Find window.
After using bookmarks regularly over the past year, I have discovered three distinct use cases where they come in handy:
To-Dos - This one is probably pretty obvious, but whenever there is a section of code that you know you'll need to revisit, stick a #todo bookmark there and use the Bookmark Manager to come back to it later.
Benchmarking - When I'm investigating a large app for performance improvements, I'll often make tweaks in several places to try to speed things up...turning on inlining, setting reentrancy, parallelizing For Loops, etc. I leave bookmarks (#inlined, #reentrant, etc.) where I make these changes to make it easy to come back to them later if necessary.
Code Review - I have a colleague with whom I've been doing frequent code reviews, and he's a Bookmark Believer too. It is so nice to arrive at his desk for a code review, and to see the Bookmark Manager already open on his screen, with #review bookmarks ready to go through, outlining all the changes he made.
So if you have LabVIEW 2013 or later, you should really start using this great feature! One final note...if you are using the Bookmark Manager to navigate through code that ships with LabVIEW, you might want to add these INI tokens to your LabVIEW INI file:
BookmarkManager.ShowVILIB=TRUE (LabVIEW 2013 and later)
BookmarkManager.ShowRESOURCE=TRUE (LabVIEW 2014 and later)
Without these INI tokens, the Bookmark Manager will not show bookmarks in VIs that live in the [LabVIEW 20xx]\vi.lib or [LabVIEW 20xx]\resource folders. Obviously I need these tokens for my work in LabVIEW R&D, but I can think of use cases where other LabVIEW developers might need to navigate bookmarks in shipping LabVIEW VIs as well.
What are bookmarks? Any word preceded by a "#" symbol within a free label, object label, wire label, or subdiagram label on the block diagram. So they're super-easy to create (you just type!), and also very easy to manage with the View > Bookmark Manager window. And my favorite (often-overlooked) aspect of the Bookmark Manager is that it will parse all of the VIs in your project for bookmarks, even VIs that are not in memory! In my opinion, that's the primary benefit that the Bookmark Manager provides over the standard Find window.
After using bookmarks regularly over the past year, I have discovered three distinct use cases where they come in handy:
To-Dos - This one is probably pretty obvious, but whenever there is a section of code that you know you'll need to revisit, stick a #todo bookmark there and use the Bookmark Manager to come back to it later.
Benchmarking - When I'm investigating a large app for performance improvements, I'll often make tweaks in several places to try to speed things up...turning on inlining, setting reentrancy, parallelizing For Loops, etc. I leave bookmarks (#inlined, #reentrant, etc.) where I make these changes to make it easy to come back to them later if necessary.
Code Review - I have a colleague with whom I've been doing frequent code reviews, and he's a Bookmark Believer too. It is so nice to arrive at his desk for a code review, and to see the Bookmark Manager already open on his screen, with #review bookmarks ready to go through, outlining all the changes he made.
So if you have LabVIEW 2013 or later, you should really start using this great feature! One final note...if you are using the Bookmark Manager to navigate through code that ships with LabVIEW, you might want to add these INI tokens to your LabVIEW INI file:
BookmarkManager.ShowVILIB=TRUE (LabVIEW 2013 and later)
BookmarkManager.ShowRESOURCE=TRUE (LabVIEW 2014 and later)
Without these INI tokens, the Bookmark Manager will not show bookmarks in VIs that live in the [LabVIEW 20xx]\vi.lib or [LabVIEW 20xx]\resource folders. Obviously I need these tokens for my work in LabVIEW R&D, but I can think of use cases where other LabVIEW developers might need to navigate bookmarks in shipping LabVIEW VIs as well.
Thursday, August 14, 2014
SubVI Panels as Modal Dialogs - A How-To Guide
It's fairly common in LabVIEW applications to display the front panel of a subVI in order to retrieve inputs from the user, or to just display information. Unfortunately, there are several "gotchas" associated with this seemingly simple use-case. Follow these steps to ensure your modal subVI panel functions properly.
- Handle the opening and closing of the subVI panel programmatically. You may be tempted to use the SubVI Node Setup right-click option on the subVI to easily display the subVI panel when it executes:

The biggest problem with using this option is that your subVI is not allowed to run any initialization code before displaying its panel. If your subVI needs to move/disable/hide controls and indicators, you have no control over when it is "safe" to display the subVI panel when using this option. So instead, use the FP.Open method to display the subVI panel once you have initialized it, and use the FP.Close method to close it once the user dismisses the subVI dialog:
- Configure the VI Properties of the subVI properly. You'll want the Window Appearance in VI Properties to be set to "Custom", with custom settings like this:

Note that the menu bar, title bar, and scrollbars have all been hidden. Also note that the Show Abort Button option is disabled...this is so a user can't abort your entire application by pressing Ctrl-. while your subVI dialog is active. The Window Behavior is set as Modal, and note that the Show front panel when called option is disabled, to avoid the same issues described in point #1 above. - Call your modal dialog subVI dynamically. Whenever you run a VI, all of its statically-called subVIs (i.e. normal subVIs sitting on its diagram) are reserved for running. This means that none of the subVIs are in edit mode, since they may be executed by the top-level VI at some point. An unfortunate side effect of this behavior is that any reserved subVI that also has a modal window appearance will be immediately displayed if its front panel is already open. And since it is a modal window, you cannot dismiss it (since it's not running, it's just reserved for running). The best way to avoid this problem (other than always making sure your modal subVI panels are closed before running) is to call the modal dialog subVI dynamically:

By changing the subVI to Load and retain on first call, it will no longer be reserved for running when you run the top-level VI, and as a result, will not ever hang your app if you accidentally leave it open before running.
Saturday, November 3, 2012
Getting Started with Custom Quick Drop Keyboard Shortcuts
Back when I first introduced Quick Drop Keyboard Shortcuts (QDKS) in LabVIEW 2009, I wrote this blog post that discussed how to write your own shortcuts. That information is still valid (for LabVIEW 2009, anyway), but it's a bit dated, and doesn't quite discuss all the details and functionality available today. Plus, I've been asked several times recently about how to "get started" writing custom QDKS. So this blog post will be a a refresher, along with up-to-date information about what's currently available in LabVIEW 2012 that pertains to QDKS.
Template
There is a plugin template that ships with LabVIEW that you can use to get started writing your shortcut:
[LabVIEW 2012]\resource\dialog\QuickDrop\QuickDrop Plugin Template.vi
Yes, I know it should be a .vit file, and it will be in LabVIEW 2013...but for now, you have to save your own copy somewhere. Anyway, this VI is full of commentary describing how you go about adding the necessary scripting code for your plugin. The template already includes the bookend code necessary to set up an Undo transaction for whatever operation your plugin performs.
File Locations
You can place your plugin VI in one of the following two locations to make it available as a QDKS:
[LabVIEW 20xx]\resource\dialog\QuickDrop\plugins
[LabVIEW Data]\Quick Drop Plugins
If you put your plugin in the LabVIEW 20xx folder, it will only be available in that version of LabVIEW. If you put it in the LabVIEW Data folder, it will be available in any LabVIEW version (2010 and later), as long as you saved it in the earliest LabVIEW version you want to support.
Getting Started
Not sure how to get started actually writing the scripting code for your plugin? The shipping plugins are all fully documented, so you can browse their code for reference:
[LabVIEW 2012]\resource\dialog\QuickDrop\plugins
The Wire All Terminals and VI Server Rename plugins are password-protected because they use private scripting functionality, but the other plugins are available for your perusal. If you need any help writing your plugin, the Quick Drop Enthusiasts group on the NI Community has lots of experience writing shortcuts, and there are dozens of community shortcuts that you can use for reference as well.
Sharing your Shortcut
Once your plugin is ready for prime time, share it with the world! Post it to the Quick Drop Enthusiasts community, and include a link to it on the List of Community Quick Drop Keyboard Shortcuts page.
Friday, August 24, 2012
What's the Deal with Coercion Dots?
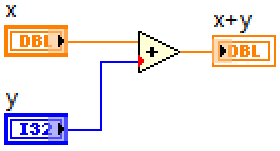
Let's talk about those little red dots on your diagram:
Background
They used to be gray, but we changed the default color of coercion dots to red in LabVIEW 8.2, presumably to make them easier to see (and so their appearance wouldn't be confused with the Show Buffer Allocations feature). Note that you can change the color of coercion dots in Tools > Options > Environment > Colors > Coercion Dots, but most people keep them red.
So what is a coercion dot, anyway? It is LabVIEW's way of telling you that you have mismatched data types wired together, but they're close enough that your VI will still compile. Contrast the image above with this one:

In the first image, you have two (different) numeric types wired to the Add function. Since both types are numeric, the Add will work, after it coerces one of the inputs (the I32) to match the other (the DBL). In the second image, you're trying to add a numeric and a path. Those types are incompatible...no coercion can be performed, so you get a broken wire.
The purpose of the coercion dot is to inform you, the programmer, when LabVIEW is performing a conversion behind the scenes. You could explicitly perform this conversion yourself, thereby removing the coercion dot entirely:

Scalar Numeric Coercions
So how does LabVIEW decide which type will be coerced? In the case of DBL vs. I32, it's rather straightforward...the I32 will be coerced, because coercing the DBL would lose fractional data. Depending on which value is coerced, 1.7 (DBL) + 3 (I32) would either equal 4.7 (DBL) or 5 (I32)...I think we all agree that 4.7 is the better answer. :)
So for coercions like I32 -> DBL, you don't really need to worry about the coercion dot. You could add the To Double Precision Float conversion function (these are often called conversion "bullets") to your diagram like the previous screenshot, but it's just going to do exactly what the coercion dot is already doing.
But what about trickier numeric coercions? Check out this diagram:

I have indicated the data types of the constants in their labels. In this diagram, the I16 has been coerced to a U16 value. But since the result of this operation is a negative number, the U16 rolls under, and this diagram generates a value of '65531', even though you probably wanted it to generate '-5'. So this would be a case where an explicit conversion on your part (specifically, of the U16 to an I16) would have been preferable. When dealing with integer data types in particular, you'll always want to keep an eye out for places where roll unders or roll overs might occur.
One nifty feature to mention here is the Adapt to Source right-click menu option on numeric indicator terminals:

If you do convert the U16 input to an I16, and you have Adapt to Source enabled on the indicator, then its data type will automatically change to an I16 once the types match.
Array Coercions
A lot of the paranoia surrounding coercion dots is the concern that they "affect memory usage". In practice, this often turns out not to be true. Check out this diagram:

Now, the "coercion dots are bad!" crowd would tell you that, in order to avoid additional memory usage because of the different data types, you need to do something about that coercion dot, particularly if this loop is running a whole bunch of times (since the arrays might be very large). Well, it turns out that, no matter how I try to "optimize" this diagram to remove the coercion dot (a few things I tried included using a conversion bullet on the iteration count, a conversion bullet on the I32 array, and maintaining my own DBL iteration count in a shift register), all other approaches used more memory during execution than the simple coercion dot approach illustrated here. So before you go trying to get rid of every coercion dot on your diagrams because you're afraid they affect performance and memory, I'd recommend actually using the Profile Performance and Memory Window to see if any of the alternative approaches really are better.
Typedef Coercions
Another thing to look out for is coercion on typedef terminals. In these cases, the data types contained in the wire might be the same, but if one end of the wire is typedefed, and the other is not, you'll get a coercion dot. In general, you're going to want to make sure this does not happen, and the easiest way to do so is to ensure that the source and the sink of the wire are both linked to the same typedef. If you do not do this, and you see a coercion dot on a typedef terminal, then you may have problems when you change the data type of the typedef...the typedefed terminal will change, but the other terminal will not. In the case of types like clusters and enums, you'll get a broken wire when the typedef changes. If you have many non-typedefs wired to typedefs throughout your VIs, these broken wires can become tedious to correct. The easiest way to avoid these kinds of problems is to make sure the terminals wired together are linked to the same typedef. For more information about typedefs, check out this Eyes on VIs post.
Variant Coercion
Another time when you'll frequently see coercion dots is when you're dealing with variant data types. Since a variant can contain any LabVIEW data type, you'll often see APIs where you will wire a specific type into a variant terminal, and you'll see a coercion dot. Again, this is perfectly fine, and it's usually a waste of diagram space to use the To Variant function to eliminate the coercion dot. The only time I can recall using To Variant was when I had a case structure generating a variety of types in different cases, all of which went to the same (variant) output tunnel. In this case, I had to use To Variant to avoid assigning a specific, non-variant type to the tunnel:

Identifying Coerced Types
If you want some more details about the specific types that are causing a coercion dot, there's a great new feature in LabVIEW 2012 that will display (in the Context Help window) the wired type, and the expected type, of a coerced terminal:

Summary
There are some other interesting scenarios involving coercion dots, like Dynamic Data, LabVIEW class wires, strict VI Server reference types, and more. But for now, I'm hoping this blog post gives a good introduction to some more general issues regarding coercion dots. I have described several scenarios that you need to watch out for...but these tend to be corner cases. Usually, LabVIEW is doing the right thing behind the scenes when it has to coerce data types, and you won't need to worry much about memory usage, performance, etc., as long as you pay attention to the types you're using in the first place.
Background
They used to be gray, but we changed the default color of coercion dots to red in LabVIEW 8.2, presumably to make them easier to see (and so their appearance wouldn't be confused with the Show Buffer Allocations feature). Note that you can change the color of coercion dots in Tools > Options > Environment > Colors > Coercion Dots, but most people keep them red.
So what is a coercion dot, anyway? It is LabVIEW's way of telling you that you have mismatched data types wired together, but they're close enough that your VI will still compile. Contrast the image above with this one:

In the first image, you have two (different) numeric types wired to the Add function. Since both types are numeric, the Add will work, after it coerces one of the inputs (the I32) to match the other (the DBL). In the second image, you're trying to add a numeric and a path. Those types are incompatible...no coercion can be performed, so you get a broken wire.
The purpose of the coercion dot is to inform you, the programmer, when LabVIEW is performing a conversion behind the scenes. You could explicitly perform this conversion yourself, thereby removing the coercion dot entirely:


Scalar Numeric Coercions
So how does LabVIEW decide which type will be coerced? In the case of DBL vs. I32, it's rather straightforward...the I32 will be coerced, because coercing the DBL would lose fractional data. Depending on which value is coerced, 1.7 (DBL) + 3 (I32) would either equal 4.7 (DBL) or 5 (I32)...I think we all agree that 4.7 is the better answer. :)
So for coercions like I32 -> DBL, you don't really need to worry about the coercion dot. You could add the To Double Precision Float conversion function (these are often called conversion "bullets") to your diagram like the previous screenshot, but it's just going to do exactly what the coercion dot is already doing.
But what about trickier numeric coercions? Check out this diagram:

I have indicated the data types of the constants in their labels. In this diagram, the I16 has been coerced to a U16 value. But since the result of this operation is a negative number, the U16 rolls under, and this diagram generates a value of '65531', even though you probably wanted it to generate '-5'. So this would be a case where an explicit conversion on your part (specifically, of the U16 to an I16) would have been preferable. When dealing with integer data types in particular, you'll always want to keep an eye out for places where roll unders or roll overs might occur.
One nifty feature to mention here is the Adapt to Source right-click menu option on numeric indicator terminals:

If you do convert the U16 input to an I16, and you have Adapt to Source enabled on the indicator, then its data type will automatically change to an I16 once the types match.
Array Coercions
A lot of the paranoia surrounding coercion dots is the concern that they "affect memory usage". In practice, this often turns out not to be true. Check out this diagram:

Now, the "coercion dots are bad!" crowd would tell you that, in order to avoid additional memory usage because of the different data types, you need to do something about that coercion dot, particularly if this loop is running a whole bunch of times (since the arrays might be very large). Well, it turns out that, no matter how I try to "optimize" this diagram to remove the coercion dot (a few things I tried included using a conversion bullet on the iteration count, a conversion bullet on the I32 array, and maintaining my own DBL iteration count in a shift register), all other approaches used more memory during execution than the simple coercion dot approach illustrated here. So before you go trying to get rid of every coercion dot on your diagrams because you're afraid they affect performance and memory, I'd recommend actually using the Profile Performance and Memory Window to see if any of the alternative approaches really are better.
Typedef Coercions
Another thing to look out for is coercion on typedef terminals. In these cases, the data types contained in the wire might be the same, but if one end of the wire is typedefed, and the other is not, you'll get a coercion dot. In general, you're going to want to make sure this does not happen, and the easiest way to do so is to ensure that the source and the sink of the wire are both linked to the same typedef. If you do not do this, and you see a coercion dot on a typedef terminal, then you may have problems when you change the data type of the typedef...the typedefed terminal will change, but the other terminal will not. In the case of types like clusters and enums, you'll get a broken wire when the typedef changes. If you have many non-typedefs wired to typedefs throughout your VIs, these broken wires can become tedious to correct. The easiest way to avoid these kinds of problems is to make sure the terminals wired together are linked to the same typedef. For more information about typedefs, check out this Eyes on VIs post.
Variant Coercion
Another time when you'll frequently see coercion dots is when you're dealing with variant data types. Since a variant can contain any LabVIEW data type, you'll often see APIs where you will wire a specific type into a variant terminal, and you'll see a coercion dot. Again, this is perfectly fine, and it's usually a waste of diagram space to use the To Variant function to eliminate the coercion dot. The only time I can recall using To Variant was when I had a case structure generating a variety of types in different cases, all of which went to the same (variant) output tunnel. In this case, I had to use To Variant to avoid assigning a specific, non-variant type to the tunnel:

Identifying Coerced Types
If you want some more details about the specific types that are causing a coercion dot, there's a great new feature in LabVIEW 2012 that will display (in the Context Help window) the wired type, and the expected type, of a coerced terminal:

Summary
There are some other interesting scenarios involving coercion dots, like Dynamic Data, LabVIEW class wires, strict VI Server reference types, and more. But for now, I'm hoping this blog post gives a good introduction to some more general issues regarding coercion dots. I have described several scenarios that you need to watch out for...but these tend to be corner cases. Usually, LabVIEW is doing the right thing behind the scenes when it has to coerce data types, and you won't need to worry much about memory usage, performance, etc., as long as you pay attention to the types you're using in the first place.
Friday, May 11, 2012
Spell Checking in LabVIEW
Did you know that LabVIEW has a spell checker? Well, sort of. It's the 'Spell Check' test of the VI Analyzer Toolkit. The VI Analyzer Toolkit is a LabVIEW toolkit that you can either purchase separately, or is included as part of the NI Developer Suite.
The Spell Check test will check the spelling of words it finds in your VI against three different dictionaries: (1) standard English words, (2) engineering and scientific technical terms, and (3) custom words added by the user. The following configuration options can be used to customize which parts of your VI are checked, and what kind of words are checked (the screenshot shows the default selected options for the test):

But enough of the sales pitch (we've got other people around here for that)...here are some of the reasons our current spell checking solution is less than ideal:
The Spell Check test will check the spelling of words it finds in your VI against three different dictionaries: (1) standard English words, (2) engineering and scientific technical terms, and (3) custom words added by the user. The following configuration options can be used to customize which parts of your VI are checked, and what kind of words are checked (the screenshot shows the default selected options for the test):
But enough of the sales pitch (we've got other people around here for that)...here are some of the reasons our current spell checking solution is less than ideal:
- Lack of integration - If you want to spell check your code, currently you have to run a separate tool (VI Analyzer) in order to see the results of the misspellings, as opposed to the standard way of just getting a red wavy underline of misspelled words as you type. Also, to add a word to the custom dictionary, you have to do that through the VI Analyzer as well, as opposed to simply being able to right-click a word and add it to the custom dictionary. Although I suppose it wouldn't be too tough to write a Quick Drop Keyboard Shortcut or a JKIRCF plugin to enable a UI gesture to do this as you sift through your VI Analyzer results.
- English only - The VI Analyzer Toolkit is not localized, so we only provide English dictionaries.
- Maintenance difficulty - Ok, this one is kind of selfish, but it's up to me, as the VI Analyzer Toolkit owner, to keep track of LabVIEW features that add different text fields to a VI so I can add the scripting code to the Spell Check test to get the text out of those fields. In fact, I discovered recently a feature that was added two releases ago that I have yet to add Spell Check support for... :\
- Do you use the VI Analyzer Spell Check test? If so, how has the experience been?
- Do you think it's a feature that would be worth significant investment for LabVIEW R&D to integrate better into the LabVIEW editor?
- Are there any words you've found flagged by the Spell Check test that you think should be added to our standard dictionary or our technical dictionary?
Thursday, February 9, 2012
Captions: More than You Ever Wanted to Know
Every once in a while, the subject of control/indicator captions comes up around here, and every time, confusion arises. So here we go...everything I know about captions.
The Basics
Enabling a caption on a control or indicator is straightforward enough:

If you select this option, your control doesn't appear to change if you leave the caption as its default value:
But trust me, it has. We have hidden the label of the control. You are now viewing its caption (in the same location as the label). If you give the caption a different value than the label, you will see both in the Context Help window:

Any control with its caption showing (assuming the caption is different than the label) will display the caption at the top, and the label in brackets underneath. When hovering over the terminal of a subVI, you'll see the caption of the control/indicator in the tip strip instead of the label.
Use Cases
Now why would you ever want to show the caption in the first place? I know of two possible reasons:
Deleting a Caption
In older LabVIEW versions, there was no easy way to delete the caption of a control/indicator. Thankfully, in LabVIEW 8.2 and later, it is very easy. All you need to do is select the caption with your selection tool and press the 'Delete' key on your keyboard. Note that this is not the same as highlighting the text in the caption and pressing the 'Delete' key...if you do that, the control will still have a caption, but it will be an empty string.
Working with Captions Programmatically
This is where it gets a little tricky. By default, controls and indicators do not have captions. Let's say you try to read the Caption.Text property of a control like this:

Believe it or not, one of three different things can happen with this code:

The "HasCaption" property will tell you if a control even has a caption to begin with, before you start trying to do other caption-related stuff.
One other nifty tip for dealing with captions programmatically...if you want to delete a caption programmatically, this is the way to do it:

Summary
So there you have it...way more information than you ever wanted to know about a LabVIEW feature that you probably weren't even using in the first place. :P But in the event that someone ever does need this information, here's hoping this blog post eventually bubbles up to the top of a "LabVIEW captions" google search. ;)
The Basics
Enabling a caption on a control or indicator is straightforward enough:

If you select this option, your control doesn't appear to change if you leave the caption as its default value:
But trust me, it has. We have hidden the label of the control. You are now viewing its caption (in the same location as the label). If you give the caption a different value than the label, you will see both in the Context Help window:

Any control with its caption showing (assuming the caption is different than the label) will display the caption at the top, and the label in brackets underneath. When hovering over the terminal of a subVI, you'll see the caption of the control/indicator in the tip strip instead of the label.
Use Cases
Now why would you ever want to show the caption in the first place? I know of two possible reasons:
- Long caption, short label - If you want your control/indicator to have a long, meaningful description on the panel, but you don't want that long string getting in the way on the diagram, you could show its caption. Personally, I eschew this approach...instead of using a caption, I would opt for a free label on the panel positioned appropriately near the control with appropriately-justified text.
- Localization - This is the primary reason we use captions in LabVIEW R&D. When we localize LabVIEW into other languages, we don't want to change the labels of controls and indicators...that could potentially break code that programmatically refers to controls and indicators by name. So instead, we show localized captions (and hide the labels) for the controls and indicators in all user-facing VIs that ship with LabVIEW.
Deleting a Caption
In older LabVIEW versions, there was no easy way to delete the caption of a control/indicator. Thankfully, in LabVIEW 8.2 and later, it is very easy. All you need to do is select the caption with your selection tool and press the 'Delete' key on your keyboard. Note that this is not the same as highlighting the text in the caption and pressing the 'Delete' key...if you do that, the control will still have a caption, but it will be an empty string.
Working with Captions Programmatically
This is where it gets a little tricky. By default, controls and indicators do not have captions. Let's say you try to read the Caption.Text property of a control like this:
Believe it or not, one of three different things can happen with this code:
- If the control already has a caption, you'll get the caption text.
- If the control doesn't already have a caption, and the VI that owns the control is in edit mode, then a caption will be created for you, with the same string as the label, and you'll get that text.
- If the control doesn't already have a caption, and the VI that owns the control is in run mode, then you'll get error 1320, which tells you that you can't read properties of control parts that haven't been created yet when the VI is in run mode.
The "HasCaption" property will tell you if a control even has a caption to begin with, before you start trying to do other caption-related stuff.
One other nifty tip for dealing with captions programmatically...if you want to delete a caption programmatically, this is the way to do it:
Summary
So there you have it...way more information than you ever wanted to know about a LabVIEW feature that you probably weren't even using in the first place. :P But in the event that someone ever does need this information, here's hoping this blog post eventually bubbles up to the top of a "LabVIEW captions" google search. ;)
Tuesday, August 2, 2011
How to Customize Edit > Create SubVI in LabVIEW 2011
LabVIEW 2011 was announced at the NI Week keynote today, and there are plenty of places you can learn about all the great new features. In this blog post, I'll describe how to customize one of the best new features...the improvements to the Edit > Create SubVI gesture in the LabVIEW IDE.
You may recall that last year, Stephen and I solicited the LabVIEW Community to vote up (or 'kudo' up, I guess) the Create a proper connector pane when doing Edit -> Create subVI idea posted by Yair on the Idea Exchange. You all responded in an impressive way, and we were able to add the feature in LabVIEW 2011. Specifically, we now create a subVI with the proper connector pane, properly-named error terminals in the bottom corners, properly-named refnum/class terminals in the top corners, and an organized front panel.
But that's not all! Thanks to Stephen, the code that modifies the created subVI is all VI-based. So if you want to customize the created subVI in some way with your own scripting VIs, there are two ways to do it. Here's how:
Providing Additional Create SubVI Functionality
Do you like the way we create the subVI, but you want to perform additional actions on it? If so, then follow these steps:
Would you rather define your own behavior for how the subVI is created? If so, then follow these steps.
I would like to eventually post some plugins of both types to the NI Community. In the meantime, please let me know if you've written some plugins to augment (or replace) the Create SubVI functionality...I'd love to see what y'all can come up with!
You may recall that last year, Stephen and I solicited the LabVIEW Community to vote up (or 'kudo' up, I guess) the Create a proper connector pane when doing Edit -> Create subVI idea posted by Yair on the Idea Exchange. You all responded in an impressive way, and we were able to add the feature in LabVIEW 2011. Specifically, we now create a subVI with the proper connector pane, properly-named error terminals in the bottom corners, properly-named refnum/class terminals in the top corners, and an organized front panel.
But that's not all! Thanks to Stephen, the code that modifies the created subVI is all VI-based. So if you want to customize the created subVI in some way with your own scripting VIs, there are two ways to do it. Here's how:
Providing Additional Create SubVI Functionality
Do you like the way we create the subVI, but you want to perform additional actions on it? If so, then follow these steps:
- Open this VI: [LabVIEW]\resource\plugins\CreateSubVI\Additional Actions Template.vi
- Save a copy of the VI here: [LabVIEW]\resource\plugins\CreateSubVI\CreateSubVI_AdditionalActions.vi
- Add scripting code to this copy of the VI to do whatever you want to the created subVI. Some ideas I've had are:
- Perform a Diagram Cleanup on the created subVI's diagram
- Wrap the created subVI's diagram in an error case structure
- Programmatically launch the Icon Editor on the created subVI
Would you rather define your own behavior for how the subVI is created? If so, then follow these steps.
- Make a copy of [LabVIEW]\resource\plugins\lv_modifyNewSubVI.vi and name it lv_modifyNewSubVI.bak.
- In the original lv_modifyNewSubVI.vi, you can remove the code on its diagram, and write your own scripting code to modify the new subVI. Here is a description of the inputs/outputs of the VI:
- VI Refnum - A VI reference to the newly created subVI.
- Fail? - If true, LabVIEW assumes an error occurred during your scripting, does not commit any of your scripting changes, and instead creates the subVI in the same way it did in LabVIEW 2010 and previous...full conpane, weirdly-named controls, etc.
- Caller Connections in/out - This is the most complicated part. The input Caller Connections array defines numeric indices for the controls/indicators on the (full) subVI conpane as it is originally created. For example, if you create a subVI with one input and one output, then the array might have the values [0,1]. You can then programmatically inspect the conpane to see which items are connected to which indices...let's say for this example, the control is index 0 and the indicator is index 1. For the output Caller Connections array, you must specify which indices on the new conpane those same objects are now wired to. So for example, if you change to a 4x2x2x4 conpane, and you place the indicator at index 0 and the control at index 11 (those are the top corners of 4x2x2x4), you would output [11,0] as the output Caller Connections. If you want to learn more about how this works, check out [LabVIEW]\resource\plugins\CreateSubVI\Calculate New Conpane Array.vi, which is the VI that figures this out for the current shipping Create SubVI technique.
- If you ever want to revert to the shipping functionality, restore the .bak copy of the VI.
I would like to eventually post some plugins of both types to the NI Community. In the meantime, please let me know if you've written some plugins to augment (or replace) the Create SubVI functionality...I'd love to see what y'all can come up with!
Wednesday, March 16, 2011
My Interview on VI Shots
Last week, Michael posted his first interview with me on VI Shots. So far, I've been impressed with the content on this blog. Additionally, with the twitter account @vishots, he retweets relevant LabVIEW-related topics posted by other twitter users.
In our interview, we talk a bit about my background in LabVIEW, along with some of my tips for programming in LabVIEW at breakneck speed. Check out our interview here. And from what I understand, Michael has lots more great LabVIEW content in the works for future podcasts and articles.
In our interview, we talk a bit about my background in LabVIEW, along with some of my tips for programming in LabVIEW at breakneck speed. Check out our interview here. And from what I understand, Michael has lots more great LabVIEW content in the works for future podcasts and articles.
Wednesday, February 16, 2011
Code Madness: The LabVIEW Example Program Challenge 2011
(What a funny coincidence that my last two LabVIEW blog posts had a college basketball-themed title. And I'm not even into college basketball. Although I guess as good as the Longhorns are doing this season, I probably should be...)
The latest LabVIEW coding contest on the NI Community has begun. Enter the LabVIEW Example Program Challenge 2011 today for your chance to win an XBox, Amazon gift cards, and other prizes. In this contest, example submissions will initially compete with one another in a qualifying round (taking place now until March 6th), with downloads, "likes", and ratings all contributing to each submissions's ranking. The top 16 submissions will then move on to a tournament-style coding competition (taking place from March 8th to April 4th), with a bracket system being used to match up winners for the rounds of 16, 8, 4, and 2, until the winner is decided in the final round.
To learn more about the Code Madness Program Challenge, visit http://www.ni.com/codechallenge. Begin submitting code today!
The latest LabVIEW coding contest on the NI Community has begun. Enter the LabVIEW Example Program Challenge 2011 today for your chance to win an XBox, Amazon gift cards, and other prizes. In this contest, example submissions will initially compete with one another in a qualifying round (taking place now until March 6th), with downloads, "likes", and ratings all contributing to each submissions's ranking. The top 16 submissions will then move on to a tournament-style coding competition (taking place from March 8th to April 4th), with a bracket system being used to match up winners for the rounds of 16, 8, 4, and 2, until the winner is decided in the final round.
To learn more about the Code Madness Program Challenge, visit http://www.ni.com/codechallenge. Begin submitting code today!
Thursday, October 7, 2010
The Sweet 16: Idea Exchange Entries That Need More Support
I've really been enjoying all the fantastic LabVIEW 2010 features that originated in the Idea Exchange, and I'm also excited about the ones we have planned for LabVIEW 2011. Last night, I went through the Idea Exchange and read through all the ideas that have more than 10, but less than 100 kudos. I found 16 that I think would really benefit the LabVIEW environment and increase my productivity, but aren't currently on our roadmap of features because they haven't bubbled up high enough in the rankings. So if you haven't already, please consider kudoing some or all of the following ideas, so we can push to get them included in LabVIEW 2012:
- Make Case Selector
- Create Space in One Direction Only
- A text toolbar
- Easier way to insert and delete element in array
- Shift-Enter should define word wrap bounds on Free Labels
- Shrink-Wrap Structures
- Sort arrow in column headers of tables and listboxes
- Make mouse wheel scroll the string control/indicator
- Make 'Type Def.' the default choice in the control editor
- Create smaller banner for libraries
- "Shift+Enter" next row in array for data entry
- Use standard Windows keyboard shortcuts to change font styles
- Key Focus Surrounding Border - Let's Get Rid of It!
- String case structures should default to being case insensitive
- Improve Tree Control Performance
- A Better "Find Missing Items" and "Find Items with No Callers" in Projects
Tuesday, July 20, 2010
Changes to the CLA Exam
The Preparing for the CLA post is one of the most highly visited links on my blog, so I figured I should post some updates that I just learned about (thanks to JG's post on LAVA) to the way the CLA exam is now done. Much of the advice I gave in the aforementioned post is no longer valid, so I'd like to highlight some of the new features of the CLA Exam as described on the NI CLA prep website:
- No more written portion - When I took the CLA exam, it contained a written portion that was 40% of my score. This part of the exam has been removed, which now makes the CLA a 100% practical exam.
- Customize LabVIEW settings prior to exam start - When I took the exam, I had to spend the first few minutes after the clock started customizing LabVIEW (adding Quick Drop shortcuts, turning off auto wire routing, etc. etc.) before I even read the first question. But now, it seems you can ask your proctor to allow you to customize LabVIEW *before* starting the exam. The following is a direct quote from the new CLA Exam Preparation Guide (page 2) on ni.com: "Please note that you will not receive extra exam time to compensate for non-familiarity with the LabVIEW environment. If you need time to customize the environment, please make arrangements with your proctor to hold off on giving you the exam packet until you are ready to start the exam."
- Sample Exam Available - There is now a CLA Practice Exam available...this is a great asset in CLA preparation that I highly recommend taking very seriously. There is also an exam solution available.
- Requirements tracking - 30% of your CLA score is now determined by requirements tracking, the details of which are described in the practice exam and prep guide documents linked above. The exam graders will be using NI Requirements Gateway to verify requirement tracking in your VIs, so make sure you adhere to the [Covers: ] syntax described in the prep guide and sample exam. Note that knowledge of NI Requirements Gateway is *not* a requirement for the CLA.
Friday, July 16, 2010
Conclusions - The Diagram Cleanup Experiment
It's been just about a year since I embarked on The Diagram Cleanup Experiment. I attempted to use block diagram cleanup on just about every VI I wrote in LabVIEW 2009 this year. With such heavy use of the feature, I have come to the following conclusions:
Tell Block Diagram Cleanup what "Clean" Looks Like
I think the easiest way to get diagram cleanup to arrange VIs to my liking is to show it VIs that I like. :) Please kudo the idea if you agree.
So that's pretty much it. In short--I like the feature, I will continue to use it because it helps me program faster, but it definitely has room for improvement.
- Use it on moderately-sized diagrams - The majority of the VIs I write fit on one screen, and have relatively low levels of nesting. For these kinds of VIs, it is *way* faster to quickly write the VI, then press Ctrl-U to clean it up. The cleanup results in these cases, although not perfect, are acceptable. The diagrams are readable enough to avoid maintenance headaches down the road.
- Don't use it on large diagrams - Diagram cleanup still has trouble with large diagrams. For top-level state machines, or similar architecture-level VIs, cleanup does not respect the arrangement of the diagram, which, for these VIs, is crucial to the understanding of the VI. I have decided that it is still best for me to arrange these diagrams myself.
- Don't use it on heavily-nested diagrams - As I mentioned in my progress report, diagram cleanup completely explodes the diagram if there is heavy structure nesting. It simply can't figure out how to condense space in multiple frames simultaneously. Until it does, I will continue to arrange heavily-nested diagrams myself.
- Mixed results with Tools > Options settings - I tried several times to tweak the settings in Tools > Options > Block Diagram > Block Diagram Cleanup to see if that would improve the cleanup arrangement, but I couldn't figure out a definitive collection of settings that always worked better. If anyone has any specific suggestions for settings that seem to improve the cleanup layout, let me know.
Tell Block Diagram Cleanup what "Clean" Looks Like
I think the easiest way to get diagram cleanup to arrange VIs to my liking is to show it VIs that I like. :) Please kudo the idea if you agree.
So that's pretty much it. In short--I like the feature, I will continue to use it because it helps me program faster, but it definitely has room for improvement.
Tuesday, June 8, 2010
I Like Global Variables
 I think the title of this post alone will probably lose me some followers on this blog. :) Nevertheless, let's proceed...
Here's the deal...global variables are not evil. There are perfectly valid use cases in which a global variable is the best tool for the job, and doing something more complicated just to say, "I didn't use globals!" doesn't make sense. Now sure, globals can be abused, and there are certainly scenarios where they are contraindicated. But if you're aware of those situations, and you avoid them, you should feel free to use globals where needed. So let's look at some use cases where, in my opinion, globals can come in handy:
- Static Data - Whenever I create a UI in LabVIEW in which user-visible strings are programmatically changed, I always store those user-visible strings in a global variable. Let's call this kind of global a Write Never, Read Many (WNRM) global. I am never writing new values into this global...I'm only reading from it in my code whenever I need to update a user-visible string. Another use case for WNRM globals is in scripting apps. When I'm doing code generation involving templates, I always store the identifying labels of panel/diagram objects within a global, and I always read those identifiers from a global in my scripting code. That way, if I need to change the identifiers in the templates, I know that I'll only need to change the identifier in one place (my global) in my scripting code. (Note: I believe Yair's Adding CONSTs to LabVIEW idea on the Idea Exchange is intended to facilitate a cleaner implementation of this use case.)
- Debug Flags - If I've got parts of my code that I want to run differently when I'm debugging, I use a WNRM global. I'll open the global and change the debug flags before I run my code. Someone once suggested that I should instead use Conditional Disable Structures with conditional symbols in my project, but after I looked into it, I decided that the added complexity and configuration associated with conditional symbols didn't add enough value over the simple global solution.
- Configuration Data - In this scenario, we are initializing configuration data (from an INI file, for instance) at some point in our code, and reading that data at later points. So here we have a Write Once, Read Many (WORM) global. (Note: The term WORM global was first coined by tbob on the NI Forums a few months back.) As long as there is one, single place where the global is written, it is perfectly fine to have many other places in your code that read that global.
Monday, January 11, 2010
Ain't No Party Like a CLA Party...
If you are a Certified LabVIEW Architect, make sure you are in Austin on March 8-9 for the first-ever CLA Summit. In case you didn't get the memo, here it is. We also have an NI Community Group with more information and discussions about the event. There will be presentations (one of which I'll be giving), coding challenges, hang time with LabVIEW R&D, and much more. And even if your CLA certification is expired, you can still show up and recertify with the new one hour recertification exam.
So if you are (or were) a CLA, come on down to Austin in March, and make sure to bring some warm weather with you!
So if you are (or were) a CLA, come on down to Austin in March, and make sure to bring some warm weather with you!
Monday, November 2, 2009
LabVIEW Performance Tips and Tricks Webcast - Wednesday, November 4th at 11 AM
This week I am giving the following LabVIEW Virtual User Group presentation:
NI LabVIEW Virtual User Groups: Tips and Tricks to Increase LabVIEW Performance and Speed
My co-host will be Todd Sierer (of An Engineering Mind fame), and I will be giving the same Performance Tips and Tricks presentation that I gave at NI Week 2009. Hope to (virtually) see you there!
NI LabVIEW Virtual User Groups: Tips and Tricks to Increase LabVIEW Performance and Speed
My co-host will be Todd Sierer (of An Engineering Mind fame), and I will be giving the same Performance Tips and Tricks presentation that I gave at NI Week 2009. Hope to (virtually) see you there!
Tuesday, October 27, 2009
Progress Report #1 - The Block Diagram Cleanup Experiment
As I mentioned a few months ago, I am attempting to use Block Diagram Cleanup for 100% of my diagram arrangement needs in LabVIEW 2009. I figured I might post updates every once in a while detailing my progress. So here, in no particular order, are some of my observations and impressions after heavy use of block diagram cleanup for a few months:
- It Creates Big Diagrams - When left to my own devices, I create tight diagrams with very little whitespace. I have very quickly discovered that diagram cleanup is rather liberal with its allocation of whitespace. :) Typically this is because I've got a moderately nested diagram, and diagram cleanup doesn't quite know how to allocate space in each frame of a multiframe structure such that whitespace is minimized. I imagine this would be a rather difficult problem to solve, since it would require the repositioning algorithm to simultaneously keep track of the spacing in each frame of a multiframe structure.
- It Doesn't Respect My Window Size - Along similar lines, the diagram gets resized and often goes past the height and/or width of the diagram window. Sometimes I have diagram windows set to a particular size for a reason, and if I were arranging the diagram myself, I would fit the diagram within those window bounds. I wish we could constrain diagram cleanup to the current diagram's window bounds.
- It Creates Bendy Wires - I've always been very careful to minimize the number of bends in my wires, maybe because my boss was always very picky about it. In fact, he's the one who insisted "Wire Bends" be a test that shipped with VI Analyzer 1.0! Anyway, diagram cleanup doesn't seem to be so concerned about wire bends. From what little I know about the cleanup algorithm, this makes sense because the algorithm is very much concerned with node placement, and not so much wire placement (except for its strict insistence on keeping error wires straight, which I like). But if you've got nodes that you've arranged just to keep non-error wires straight, diagram cleanup will not take this into account when rearranging. Also, if you've got constants wired to things, and you've got the constants positioned to minimize wire bends, I frequently see the constant moved, and wires bent as a result.
- It Moves My Control Terminal Labels - I like my control terminals on the sides (left for controls, right for indicators)...in fact, I added the Ctrl-Space-Ctrl-T shortcut in LabVIEW 2009 to make it easier to perform this operation in bulk for all top-level terminals on the diagram. But I've noticed my terminal labels get moved by cleanup, and it doesn't look like something that's configurable.
- But...I Code Faster - Despite its shortcomings, block diagram cleanup allows me to code *much* faster than I do when arranging the diagram myself. I don't have any specifics, but I'd estimate that I write VIs about twice as fast as normal when I spend zero time arranging diagram objects myself.
Friday, October 16, 2009
Quick Drop Keyboard Shortcut - Commands for "Create" Menu Options
My third post-release Quick Drop keyboard shortcut is now available on the NI Community website. This shortcut allows you to perform all the options in the right-click > Create... menu with your keyboard. You can perform these operations with one or more objects selected. For example, you could select several control terminals on the diagram, press Ctrl-Space, type reference, and press Ctrl-A, and a control reference will be created for each one, just as if you had right-clicked them individually and selected Create > Reference on each one. Check it out and let me know what you think:
Quick Drop Keyboard Shortcut - Commands for "Create" Menu Options
Quick Drop Keyboard Shortcut - Commands for "Create" Menu Options
Thursday, August 20, 2009
Quick Drop Keyboard Shortcut - VI Server Rename
I just posted my first post-release Quick Drop keyboard shortcut on the NI Community website. This shortcut allows you to avoid the maze of right-click submenus you must navigate whenever you want to specify the VI Server class of a Class Specifier Constant, Property Node, or Invoke Node. It also allows you to specify the name of a property or method for a Property Node or Invoke Node if you don't feel like navigating those right-click menus either. Check it out and let me know what you think:
Quick Drop Keyboard Shortcut - VI Server Rename
And look for more shortcuts coming soon!
Quick Drop Keyboard Shortcut - VI Server Rename
And look for more shortcuts coming soon!
Wednesday, August 5, 2009
Write Your Own Quick Drop Keyboard Shortcuts in LabVIEW 2009
I've always thought it would be great to define my own editor operations that occur when a certain key combination is pressed. Unfortunately, every single key combination, from Ctrl-A to Ctrl-Z, is currently taken by some operation in the LabVIEW editor. During LabVIEW 2009 development, I spoke to some of my colleagues in LabVIEW R&D to see how hard it would be to allow users to override default key combinations in LabVIEW with their own G-based features. Turns out it would be pretty tough to modify the LabVIEW editor in this manner, and nobody seemed to think it could be done anytime soon.
So I took matters into my own hands and did the next best thing I could think of, which was to define some key combinations that would perform certain editor operations while Quick Drop was visible. Once you've pressed Ctrl-Space, you're in my world now. :) So in LabVIEW 2009, there are three key combinations that I've defined:
[LabVIEW 2009]\resource\dialog\QuickDrop\plugins
Inside this folder are d.vi, r.vi, and t.vi. Those are the VIs that define the Ctrl-[shift]-D, Ctrl-R, and Ctrl-T shortcuts in Quick Drop. If you want to write your own shortcut (let's say it's Ctrl-E), start with resource\dialog\QuickDrop\QuickDrop Plugin Template.vi, save it as e.vi in the plugins folder, and now you have a Ctrl-Space-Ctrl-E shortcut!
As I get time in the coming months, I plan on posting new shortcuts to the NI Community that I didn't quite have time to squeeze into the LabVIEW 2009 release.
So I took matters into my own hands and did the next best thing I could think of, which was to define some key combinations that would perform certain editor operations while Quick Drop was visible. Once you've pressed Ctrl-Space, you're in my world now. :) So in LabVIEW 2009, there are three key combinations that I've defined:
- Ctrl-[shift]-D - If you select some diagram objects, then press Ctrl-Space-Ctrl-D, controls and indicators will be automatically created and wired for all inputs and outputs of the selected objects. If you press Ctrl-Space-Ctrl-Shift-D, constants will be created and wired for all inputs.
- Ctrl-R - If you select some diagram objects, then press Ctrl-Space-Ctrl-R, those objects will be removed from the diagram, but all wires that had pass-through inputs and outputs on those objects (like refnum or error wires) will be retained.
- Ctrl-T - If you press Ctrl-Space-Ctrl-T while a diagram is open, the labels of all control/indicator terminals on the top-level diagram are moved the left/right of the terminal, respectively.
[LabVIEW 2009]\resource\dialog\QuickDrop\plugins
Inside this folder are d.vi, r.vi, and t.vi. Those are the VIs that define the Ctrl-[shift]-D, Ctrl-R, and Ctrl-T shortcuts in Quick Drop. If you want to write your own shortcut (let's say it's Ctrl-E), start with resource\dialog\QuickDrop\QuickDrop Plugin Template.vi, save it as e.vi in the plugins folder, and now you have a Ctrl-Space-Ctrl-E shortcut!
As I get time in the coming months, I plan on posting new shortcuts to the NI Community that I didn't quite have time to squeeze into the LabVIEW 2009 release.
Subscribe to:
Posts (Atom)