- When to Close References - For every single VI Server reference type *except* VI and Application, it's fine to close the reference as soon as you're done with it. I've seen people write scripting VIs before where they thought they needed to keep each "parent" reference open as long as they were using a child reference. This is not the case. Check out this sample diagram, which is getting the first tunnel it finds on a Case Structure and determining if it is an output or an input tunnel:

This code will work, but those wires don't need to span the entire diagram just to be closed later. You can imagine these wires could get very long as the complexity of your scripting code increases. Instead, take an approach like this:
Here, we are closing the references as soon as we're done with them. The diagram looks cleaner, and we don't have to worry about passing really long wires around. Also, note the trick I'm doing with the array of Tunnel references. Often in VI Scripting, you'll have an array of references, but you're only interested in one of those references. In these cases, you can use the Delete From Array function to pull out the one you're interested in, and close all the rest. - Comparing References - If you are trying to compare two references to see if they refer to the same object, you can simply use the Equal? function. Similarly, if you have an array of references, and you want to search that array to find the index of a particular reference, you can use the Search 1D Array function. Even though two references to the same object may have different flattened U32 refnum values (as can pretty easily be seen with the Type Cast function), using the comparison functions in LabVIEW will compare the actual objects those references refer to, and not the numeric refnum values, when performing the comparison.
- Checking Reference Type - Many times you'll have a reference to an object, and you'll want to figure out what type of object it is. You may be inclined to read the Class Name property of that object, but this approach can cause problems. For example, let's say you have a reference to a Node, and you want to see if it that Node is a member of the Structure class (Case Structure, While Loop, For Loop, etc.). So you read the Class Name property of the reference and see if it equals "Structure". Well, this approach will never work, because the Class Name property always returns the most specific class name of the object...so it would return CaseStructure, WhileLoop, ForLoop, etc. Instead of using the Class Name approach, you can use the To More Specific Class function and check the error output:

In this case, as long as the Node is any type of Structure, the class conversion will succeed.
Friday, June 12, 2009
LabVIEW Scripting Tip #3: How to Handle References
Once you get past the really simple scripting apps, you'll quickly discover that your scripting VIs can become unwieldy at a moment's notice, and this is primarily due to how many VI Server references you have to deal with in a complex scripting app. Here now is a list of things to keep in mind when dealing with a plethora of scripting references all over your diagram.


Friday, June 5, 2009
LabVIEW Scripting Tip #2: Supporting Undo
One of the great things about LabVIEW Scripting is that we can implement tools that perform actions in the LabVIEW editor. There are already several utilities posted on LAVA along these lines, along with the hopefully-soon-to-be-released JKI Right-Click Framework. Not to mention current and future shipping LabVIEW features.
In order to give your scripting-based utility equal footing with built-in LabVIEW features, though, you need to make sure anything you do with scripting can be undone or redone by the user. Thankfully, there is support in scripting for setting up Undo/Redo transactions, as illustrated by this screenshot:
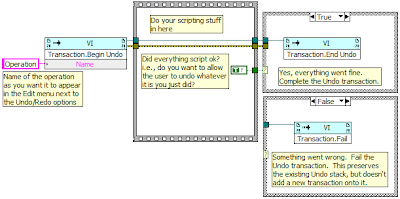
Here are some details on each of the methods shown in the screenshot:
In order to give your scripting-based utility equal footing with built-in LabVIEW features, though, you need to make sure anything you do with scripting can be undone or redone by the user. Thankfully, there is support in scripting for setting up Undo/Redo transactions, as illustrated by this screenshot:

Here are some details on each of the methods shown in the screenshot:
- Transaction.Begin Undo - Call this method before you start your scripting operation. The "Name" input is the text that you want users to see next to the Undo/Redo options in the Edit menu:

After calling Begin Undo, you will do all the scripting code you need to do for whatever editor operation you are performing. While doing your scripting, you need to keep track of a boolean, or some sort of flag, indicating whether or not you actually want to complete the Undo transaction, so you can make a decision between the following two methods. - Transaction.End Undo - Did everything script ok? Assuming you didn't get any errors, and that your scripting code actually did change something on the target VI, you need to end your Undo transaction. This actually commits the scripting action to the target VI, and creates the Edit > Undo option in the menu with the Name you specified on Begin Undo.
- Transaction.Fail - Did an error occur during your scripting? Or did your scripting code not actually change anything? If either of these is the case, you probably want to Fail the transaction. This means that the transaction is not committed to the target VI, and that no new Undo option is added to the Edit menu. Notice that in my screenshot, I do not wire the error up to the Transaction.Fail method. This is because, if an error occurred in my scripting, I still want the Fail method to execute so it cancels the transaction.

Wednesday, June 3, 2009
LabVIEW Scripting Tip #1: The Power of Traverse
This blog post is the first in an as yet unknown number of posts detailing some useful tips I have on LabVIEW Scripting.
If you're ever examining VIs to find objects of a particular type, then you definitely want to check out the following utility VI:
[LabVIEW]\vi.lib\utility\traverseref.llb\TRef Traverse for References.vi
This VI will return references to all the objects of a given class that reside within the panel, diagram, or a user-defined object in a VI. The traversal is recursive, so it will find objects nested within other objects. Here's a simple example that finds all the Case Structures on a diagram:
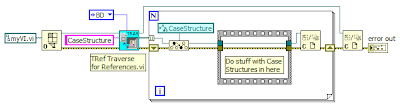
We specify a target of "BD" (for Block Diagram) and a class name of "CaseStructure", and we're good to go. Note that you can also traverse the front panel for objects by specifying a target of "FP". And if you want to traverse a specific object (i.e. find all the clusters that reside within a particular Tab Control on the front panel), then specify a target of "Other" and pass in a reference to the Tab Control to the "Other Refnum" input.
You may wonder why I recommend using this VI, when there is already a scripting property called AllObjects[] for the Diagram class (and a similar property for the panel). Well, that AllObjects[] property does not recurse into container objects. So to completely search a diagram for objects, you would need to get the AllObjects[] property, figure out which objects are containers, separate those objects out, get the container diagrams, do an AllObjects[] on them, etc. etc. This is certainly doable, and I'm guessing people have already written VIs that do this...but in my experience, using the Traverse VI is much, much faster than trying to recurse the entire diagram with AllObjects[].
This traverse VI is used extensively in the VI Analyzer Toolkit, since we are often looking for specific objects on the diagram that we need to examine. And if you know the label of a specific object you are looking for, then you can use the TRef Find Object By Label.vi in that same LLB, which is basically a wrapper for TRef Traverse for References.vi, but it goes an extra step and reads the labels of each found object until it finds the one you were looking for.
Just to give you an idea how useful this VI can be, TRef Traverse for References.vi originally shipped only with the VI Analyzer Toolkit 1.0 when LabVIEW 7.0 released. However, once it got to the point that about a dozen internal groups at NI had asked me for a copy of the Traverse VI so they could ship it with their products, I decided it would be best for all of us if a single copy of the VI shipped with core LabVIEW, which it has since LabVIEW 8.0.
If you're ever examining VIs to find objects of a particular type, then you definitely want to check out the following utility VI:
[LabVIEW]\vi.lib\utility\traverseref.llb\TRef Traverse for References.vi
This VI will return references to all the objects of a given class that reside within the panel, diagram, or a user-defined object in a VI. The traversal is recursive, so it will find objects nested within other objects. Here's a simple example that finds all the Case Structures on a diagram:

We specify a target of "BD" (for Block Diagram) and a class name of "CaseStructure", and we're good to go. Note that you can also traverse the front panel for objects by specifying a target of "FP". And if you want to traverse a specific object (i.e. find all the clusters that reside within a particular Tab Control on the front panel), then specify a target of "Other" and pass in a reference to the Tab Control to the "Other Refnum" input.
You may wonder why I recommend using this VI, when there is already a scripting property called AllObjects[] for the Diagram class (and a similar property for the panel). Well, that AllObjects[] property does not recurse into container objects. So to completely search a diagram for objects, you would need to get the AllObjects[] property, figure out which objects are containers, separate those objects out, get the container diagrams, do an AllObjects[] on them, etc. etc. This is certainly doable, and I'm guessing people have already written VIs that do this...but in my experience, using the Traverse VI is much, much faster than trying to recurse the entire diagram with AllObjects[].
This traverse VI is used extensively in the VI Analyzer Toolkit, since we are often looking for specific objects on the diagram that we need to examine. And if you know the label of a specific object you are looking for, then you can use the TRef Find Object By Label.vi in that same LLB, which is basically a wrapper for TRef Traverse for References.vi, but it goes an extra step and reads the labels of each found object until it finds the one you were looking for.
Just to give you an idea how useful this VI can be, TRef Traverse for References.vi originally shipped only with the VI Analyzer Toolkit 1.0 when LabVIEW 7.0 released. However, once it got to the point that about a dozen internal groups at NI had asked me for a copy of the Traverse VI so they could ship it with their products, I decided it would be best for all of us if a single copy of the VI shipped with core LabVIEW, which it has since LabVIEW 8.0.
Monday, May 4, 2009
2009 Reasons I Love the New LabVIEW Versioning Scheme
Ok...maybe I don't have *quite* 2009 reasons, but I am a big fan. In case you hadn't heard, the next version of LabVIEW will be LabVIEW 2009. This wasn't a big secret or anything...the new versioning scheme was revealed when we announced the beta. Going forward, each LabVIEW release will simply be versioned based on the year of its release. In no particular order, here's why I like this idea:
- It's immediately obvious how old of a LabVIEW version we're dealing with. As it is now, I can't even remember what year LabVIEW 7.0 released (I just looked it up...2003 apparently).
- We become more consistent with other software out there that is moving toward year-based versioning.
- Most toolkits will also be adopting the year-based versioning. So now we don't have to remember that Report Generation Toolkit 1.1.3 only works with LabVIEW 8.6, or that VI Analyzer Toolkit 1.1 only works with LabVIEW 8.0, 8.2, and 8.5. Going forward, Report Generation Toolkit 2009 will work with LabVIEW 2009, VI Analyzer Toolkit 2010 will work with LabVIEW 2010, etc.
- The internal version of VIs saved in LabVIEW 2009 will be 9.0. So it's pretty convenient that the year '2009' lined up with that.
- This one is minor, but up to this point, we always had a code name for LabVIEW releases in R&D. 8.6 was Saturn, 9.0 is Orion. (Again, not a big secret here...I figure if one of our VPs can talk about the code names, so can I). So when you'd talk to somebody about the release, half the time they'd use the code name, and half the time they'd use the version. Now we'll just be referring to each version by the year of its release...no more code names. Trivia question: Any non-NIers out there know the code names for prior LabVIEW releases?
- We won't be using this versioning scheme for drivers. Again, I think this makes sense, because a lot of drivers release multiple times per year. Plus, I don't think I've seen any other driver developers out there use year based versioning. It appears to be primarily for application software.
- I've noticed that people have interpreted LabVIEW version numbers in very different ways over the years. Some people think "x.0" releases are unstable and won't touch them. They prefer to wait for the much more 'stable' "x.1" release. Other people think "x.0" releases are the only ones that have any worthwhile new features, and the "x.1" releases are only 'minor updates'. Truth is, every LabVIEW release (barring x.y.z maintenance releases) is a major release. I've found must-have features in every LabVIEW version since I started programming LabVIEW. I think year-based versioning will help us all gain a more unified vision of what to expect out of a yearly LabVIEW release.
Thursday, March 19, 2009
Why Are You Still Using Loops in Your Functional Globals?
Are you still creating Functional Globals (a.k.a. LV2-style globals) that look like this?

If you're programming in LabVIEW 8.5 or later, do this instead!

In LabVIEW 8.5, Feedback Nodes gained the ability to live on the top level diagram of a VI... no loop required. This feature gives us the identical functionality of a single-iteration loop with an uninitialized shift register. And let's be honest here...the uninitialized shift register on a single-iteration loop is kind of a hack.
Not only does the Feedback Node clean up our diagrams, but it is slightly faster (sometimes by about 5-10%) than a loop with an uninitialized shift register. This is largely due to the removal of loop overhead.
So get over your Feedback Node (and backwards wire) hangups like I did and make your functional globals more efficient!

If you're programming in LabVIEW 8.5 or later, do this instead!

In LabVIEW 8.5, Feedback Nodes gained the ability to live on the top level diagram of a VI... no loop required. This feature gives us the identical functionality of a single-iteration loop with an uninitialized shift register. And let's be honest here...the uninitialized shift register on a single-iteration loop is kind of a hack.
Not only does the Feedback Node clean up our diagrams, but it is slightly faster (sometimes by about 5-10%) than a loop with an uninitialized shift register. This is largely due to the removal of loop overhead.
So get over your Feedback Node (and backwards wire) hangups like I did and make your functional globals more efficient!
Thursday, March 5, 2009
Bulk Creation of Controls and Indicators
In my previous blog post, Jason commented that it would be nice to have a utility that will create controls and indicators on diagram objects in bulk. I thought that was a good idea, and I decided to write a VI that gets us pretty darn close...it's not quite a right-click option, but it's as close as I can get without getting a C-monkey to modify the LabVIEW source code for me, and without having plug-in VIs yet.
So put this VI in [LabVIEW 8.6]\project and restart LabVIEW. You'll now have a Tools > Create Controls and Indicators menu option. Select a few block diagram objects, then choose this menu option. It will create controls and indicators for any terminals of the selected object(s) that aren't already wired to something. This transaction is undoable/redoable as well.
I hope this VI is useful to people. I also had another motive for writing it, but you'll have to wait until my next blog post to find out what that was.
So put this VI in [LabVIEW 8.6]\project and restart LabVIEW. You'll now have a Tools > Create Controls and Indicators menu option. Select a few block diagram objects, then choose this menu option. It will create controls and indicators for any terminals of the selected object(s) that aren't already wired to something. This transaction is undoable/redoable as well.
I hope this VI is useful to people. I also had another motive for writing it, but you'll have to wait until my next blog post to find out what that was.
Tuesday, March 3, 2009
A Good Use for Block Diagram Cleanup
One of the big new features of LabVIEW 8.6 is Block Diagram Cleanup, a way to instantly rearrange block diagram contents to make them look "better". In fact, I demoed this feature briefly during my NI Week 2008 keynote appearance. In practice, however, I find that I don't really use the feature all that much. Keeping the diagram clean as I write code has been an integral part of the way I do my job for the past several years, and honestly, if I run Block Diagram Cleanup on my clean code, it makes it considerably less clean. I know many other advanced LabVIEW developers who feel the same way.
Lately though, I have discovered a perfectly valid niche use case for this feature. One of the great things about LabVIEW is how easy it is to write "throw away" code...you know, that simple prototype VI that you write just to test an idea, or that debugging VI that helps you quickly unit test something you're working on...or even the VI where you just drop a single function and wire a few things in to double-check that it works the way you expect (I do this with Match Pattern about once every few months). Well, I tend to write throw away code very quickly, with no regard for "cleanliness". It's these throw away VIs that are the perfect candidates for Block Diagram Cleanup...with a single Ctrl-U, my code becomes considerably more clean than it was before, when I was slinging objects left and right with Quick Drop and reckless abandon. And even though it's throw away code, it's still easier to understand and modify (before I throw it away) if it's clean.
Here's an example "before and after" of one of these situations. In this case, I wanted a VI that displayed every single value in my LabVIEW Class data...in this case, there were several subclasses that contained arrays, so a simple probe wouldn't let me see multiple array elements at once...so I basically wrote a huge "probe" VI that displayed a bunch of these arrays, with several elements expanded. This VI was purely for debugging, and would be of limited utility once I got all my class data straightened out...in other words, it was a "throw away" VI. So I slopped it together, then I cleaned it up. Although not perfect, the cleaned up version is much easier to understand (sorry for all the Wite-Out...these classes pertain to features that have yet to be released):
Before:

After:

I understand that this might be a pretty limited use case, but who knows...maybe I should get my feet wet with the feature now, in the event that it gets a lot better in a future LabVIEW version?
Lately though, I have discovered a perfectly valid niche use case for this feature. One of the great things about LabVIEW is how easy it is to write "throw away" code...you know, that simple prototype VI that you write just to test an idea, or that debugging VI that helps you quickly unit test something you're working on...or even the VI where you just drop a single function and wire a few things in to double-check that it works the way you expect (I do this with Match Pattern about once every few months). Well, I tend to write throw away code very quickly, with no regard for "cleanliness". It's these throw away VIs that are the perfect candidates for Block Diagram Cleanup...with a single Ctrl-U, my code becomes considerably more clean than it was before, when I was slinging objects left and right with Quick Drop and reckless abandon. And even though it's throw away code, it's still easier to understand and modify (before I throw it away) if it's clean.
Here's an example "before and after" of one of these situations. In this case, I wanted a VI that displayed every single value in my LabVIEW Class data...in this case, there were several subclasses that contained arrays, so a simple probe wouldn't let me see multiple array elements at once...so I basically wrote a huge "probe" VI that displayed a bunch of these arrays, with several elements expanded. This VI was purely for debugging, and would be of limited utility once I got all my class data straightened out...in other words, it was a "throw away" VI. So I slopped it together, then I cleaned it up. Although not perfect, the cleaned up version is much easier to understand (sorry for all the Wite-Out...these classes pertain to features that have yet to be released):
Before:

After:

I understand that this might be a pretty limited use case, but who knows...maybe I should get my feet wet with the feature now, in the event that it gets a lot better in a future LabVIEW version?
Subscribe to:
Posts (Atom)