This week I am giving the following LabVIEW Virtual User Group presentation:
NI LabVIEW Virtual User Groups: Tips and Tricks to Increase LabVIEW Performance and Speed
My co-host will be Todd Sierer (of An Engineering Mind fame), and I will be giving the same Performance Tips and Tricks presentation that I gave at NI Week 2009. Hope to (virtually) see you there!
Monday, November 2, 2009
Tuesday, October 27, 2009
Progress Report #1 - The Block Diagram Cleanup Experiment
As I mentioned a few months ago, I am attempting to use Block Diagram Cleanup for 100% of my diagram arrangement needs in LabVIEW 2009. I figured I might post updates every once in a while detailing my progress. So here, in no particular order, are some of my observations and impressions after heavy use of block diagram cleanup for a few months:
- It Creates Big Diagrams - When left to my own devices, I create tight diagrams with very little whitespace. I have very quickly discovered that diagram cleanup is rather liberal with its allocation of whitespace. :) Typically this is because I've got a moderately nested diagram, and diagram cleanup doesn't quite know how to allocate space in each frame of a multiframe structure such that whitespace is minimized. I imagine this would be a rather difficult problem to solve, since it would require the repositioning algorithm to simultaneously keep track of the spacing in each frame of a multiframe structure.
- It Doesn't Respect My Window Size - Along similar lines, the diagram gets resized and often goes past the height and/or width of the diagram window. Sometimes I have diagram windows set to a particular size for a reason, and if I were arranging the diagram myself, I would fit the diagram within those window bounds. I wish we could constrain diagram cleanup to the current diagram's window bounds.
- It Creates Bendy Wires - I've always been very careful to minimize the number of bends in my wires, maybe because my boss was always very picky about it. In fact, he's the one who insisted "Wire Bends" be a test that shipped with VI Analyzer 1.0! Anyway, diagram cleanup doesn't seem to be so concerned about wire bends. From what little I know about the cleanup algorithm, this makes sense because the algorithm is very much concerned with node placement, and not so much wire placement (except for its strict insistence on keeping error wires straight, which I like). But if you've got nodes that you've arranged just to keep non-error wires straight, diagram cleanup will not take this into account when rearranging. Also, if you've got constants wired to things, and you've got the constants positioned to minimize wire bends, I frequently see the constant moved, and wires bent as a result.
- It Moves My Control Terminal Labels - I like my control terminals on the sides (left for controls, right for indicators)...in fact, I added the Ctrl-Space-Ctrl-T shortcut in LabVIEW 2009 to make it easier to perform this operation in bulk for all top-level terminals on the diagram. But I've noticed my terminal labels get moved by cleanup, and it doesn't look like something that's configurable.
- But...I Code Faster - Despite its shortcomings, block diagram cleanup allows me to code *much* faster than I do when arranging the diagram myself. I don't have any specifics, but I'd estimate that I write VIs about twice as fast as normal when I spend zero time arranging diagram objects myself.
Friday, October 16, 2009
Quick Drop Keyboard Shortcut - Commands for "Create" Menu Options
My third post-release Quick Drop keyboard shortcut is now available on the NI Community website. This shortcut allows you to perform all the options in the right-click > Create... menu with your keyboard. You can perform these operations with one or more objects selected. For example, you could select several control terminals on the diagram, press Ctrl-Space, type reference, and press Ctrl-A, and a control reference will be created for each one, just as if you had right-clicked them individually and selected Create > Reference on each one. Check it out and let me know what you think:
Quick Drop Keyboard Shortcut - Commands for "Create" Menu Options
Quick Drop Keyboard Shortcut - Commands for "Create" Menu Options
Thursday, August 20, 2009
Quick Drop Keyboard Shortcut - VI Server Rename
I just posted my first post-release Quick Drop keyboard shortcut on the NI Community website. This shortcut allows you to avoid the maze of right-click submenus you must navigate whenever you want to specify the VI Server class of a Class Specifier Constant, Property Node, or Invoke Node. It also allows you to specify the name of a property or method for a Property Node or Invoke Node if you don't feel like navigating those right-click menus either. Check it out and let me know what you think:
Quick Drop Keyboard Shortcut - VI Server Rename
And look for more shortcuts coming soon!
Quick Drop Keyboard Shortcut - VI Server Rename
And look for more shortcuts coming soon!
Wednesday, August 5, 2009
Write Your Own Quick Drop Keyboard Shortcuts in LabVIEW 2009
I've always thought it would be great to define my own editor operations that occur when a certain key combination is pressed. Unfortunately, every single key combination, from Ctrl-A to Ctrl-Z, is currently taken by some operation in the LabVIEW editor. During LabVIEW 2009 development, I spoke to some of my colleagues in LabVIEW R&D to see how hard it would be to allow users to override default key combinations in LabVIEW with their own G-based features. Turns out it would be pretty tough to modify the LabVIEW editor in this manner, and nobody seemed to think it could be done anytime soon.
So I took matters into my own hands and did the next best thing I could think of, which was to define some key combinations that would perform certain editor operations while Quick Drop was visible. Once you've pressed Ctrl-Space, you're in my world now. :) So in LabVIEW 2009, there are three key combinations that I've defined:
[LabVIEW 2009]\resource\dialog\QuickDrop\plugins
Inside this folder are d.vi, r.vi, and t.vi. Those are the VIs that define the Ctrl-[shift]-D, Ctrl-R, and Ctrl-T shortcuts in Quick Drop. If you want to write your own shortcut (let's say it's Ctrl-E), start with resource\dialog\QuickDrop\QuickDrop Plugin Template.vi, save it as e.vi in the plugins folder, and now you have a Ctrl-Space-Ctrl-E shortcut!
As I get time in the coming months, I plan on posting new shortcuts to the NI Community that I didn't quite have time to squeeze into the LabVIEW 2009 release.
So I took matters into my own hands and did the next best thing I could think of, which was to define some key combinations that would perform certain editor operations while Quick Drop was visible. Once you've pressed Ctrl-Space, you're in my world now. :) So in LabVIEW 2009, there are three key combinations that I've defined:
- Ctrl-[shift]-D - If you select some diagram objects, then press Ctrl-Space-Ctrl-D, controls and indicators will be automatically created and wired for all inputs and outputs of the selected objects. If you press Ctrl-Space-Ctrl-Shift-D, constants will be created and wired for all inputs.
- Ctrl-R - If you select some diagram objects, then press Ctrl-Space-Ctrl-R, those objects will be removed from the diagram, but all wires that had pass-through inputs and outputs on those objects (like refnum or error wires) will be retained.
- Ctrl-T - If you press Ctrl-Space-Ctrl-T while a diagram is open, the labels of all control/indicator terminals on the top-level diagram are moved the left/right of the terminal, respectively.
[LabVIEW 2009]\resource\dialog\QuickDrop\plugins
Inside this folder are d.vi, r.vi, and t.vi. Those are the VIs that define the Ctrl-[shift]-D, Ctrl-R, and Ctrl-T shortcuts in Quick Drop. If you want to write your own shortcut (let's say it's Ctrl-E), start with resource\dialog\QuickDrop\QuickDrop Plugin Template.vi, save it as e.vi in the plugins folder, and now you have a Ctrl-Space-Ctrl-E shortcut!
As I get time in the coming months, I plan on posting new shortcuts to the NI Community that I didn't quite have time to squeeze into the LabVIEW 2009 release.
Tuesday, July 21, 2009
My NI Week 2009 Plans
I was inspired by Christina's NI Week post on her blog to post my tentative NI Week 2009 schedule, in case anybody is wondering where I'll be during NI Week. After each morning's keynote, I'm planning on helping out in the What's New With LabVIEW hands-on sessions at 10:30 in Room 18C each morning. After that, here are my plans (which are subject to change based on hunger, long conversations about LabVIEW, impromptu VI-writing contests, challenges from Guitar Hero robots, and many other possible NI Week-sanctioned distractions):
Tuesday
- LabVIEW Experts Panel: 12:00, Technology Theater. Maybe a LabVIEW Artisan will be allowed to hang out with LabVIEW Experts?
- Hack Your Car with NI-CAN: 1:00, Room 15. I've driven my car for months with the Check Engine light on, with no (visible) ill effects. I sure would like to be able to figure out why that light is *really* on.
- LabVIEW Scripting: 2:15, Room 16B. I'll be there mainly to help answer any specific scripting questions that might come up.
- New Software Engineering Tools in LabVIEW: 3:30, Room 16B. I honestly don't know what we're presenting on here, and I'm curious to find out.
- Challenge the Champions: 5:00, Technology Theater. I wrote some of the questions for this year's event (and not a single one of them has to do with Express VIs!).
- LAVA BBQ: 8:00, Stubb's. I *think* I can make it this year, but I'm not sure yet.
Wednesday
- Past, Present, and Future of Robots: 1:00, Room 17B. The dude that runs the Roomba company is presenting this one.
- Tools and APIs to Build on the LabVIEW Platform Hands-On: 2:15, Room 18C. I helped write a lot of the initial content for this, so I'm interested to see how it turned out.
- Memory Management in LabVIEW: 3:30, Room 16B. Dan H. is one of the foremost experts on the guts of LabVIEW. I've seen some of the content for this presentation and it should be great.
- Tips and Tricks to Speed LabVIEW Development: 4:45, Room 16A. I'm presenting this one, so I should probably show up. For those of you who came to my performance tips and tricks presentation at NI Week 2008, I've got a brand new set of tips and tricks up my sleeve this year. Don't miss it!
- LabVIEW Coding Challenge: High Noon, Technology Theater. Who dares challenge me after my resounding victory at NI Week 2008? You have all had a year to practice with Quick Drop, so no more excuses! I'm looking at you, Jim. :)
- Web Services in LabVIEW: 1:00, Room 16B. I must admit, I know a lot less about web services than I should.
- Improving the LabVIEW Upgrade Experience: 2:15, Room 16A. I'm always telling people about great new LabVIEW features, so I should probably be familiar with issues people have when trying to upgrade so they can use those new features.
- I plan on twittering frequently (with my new iPhone!) about what I'm doing and cool stuff I'm seeing at NI Week 2009. Follow me at http://www.twitter.com/dnatt if you don't already.
- The NI Week program incorrectly lists me as the presenter for Beyond the Basics: LabVIEW Debugging Techniques on Tuesday at 2:15. Actually, Tycho C., the author of the Desktop Execution Trace Toolkit, is giving that presentation.
Friday, July 17, 2009
The Diagram Cleanup Experiment
For many years now, I've taken pride in the appearance of my LabVIEW diagrams. One of my first tasks when I joined LabVIEW R&D several years ago was to rewrite the LabVIEW Style Guide, and more recently, I was very much involved in the reviews of Peter Blume's The LabVIEW Style Book. I cannot claim style perfection, but I can say that you would have to search pretty hard in all the code I've written over the years to find backwards wires, overlapping objects, uncommented code, or any other style transgressions.
However, that clean code doesn't come without a cost...a cost of time. It takes time to perfectly align objects, to minimize space to achieve optimal compactness, to align control terminals on the left and indicator terminals on the right. My kindred spirits in LabVIEW style know what I'm talking about here.
Speaking of time...for the past year, I've been enjoying how much time I've been saving with Quick Drop. I can safely say that the most constrictive bottleneck on my LabVIEW programming speed--palette navigation--is no longer an issue. But seeing as I'm always looking for ways to write more code in less time (which translates into more features for you!), I very quickly became aware of the next biggest bottleneck--clean diagram arrangement.
So I'm going to embark on a journey with LabVIEW 2009...one which is undoubtedly fraught with peril, but should ultimately benefit all LabVIEW users. I am going to throw my current method of incremental diagram arrangement out the window, and rely 100% on Diagram Cleanup to do the job for me. The way I see it, we've got a feature here that is supposed to give us clean diagrams. It's also going to have some pretty nice improvements in LabVIEW 2009. So instead of ignoring this great feature that has tons of potential, I'm going to use it, recognize its shortcomings, experiment with its customizable settings, and file CARs to make it better. I envision a day, hopefully not too far off in the future, where we can spend our programming time focusing entirely on programming, and not being distracted by aesthetics.
Friday, June 12, 2009
LabVIEW Scripting Tip #3: How to Handle References
Once you get past the really simple scripting apps, you'll quickly discover that your scripting VIs can become unwieldy at a moment's notice, and this is primarily due to how many VI Server references you have to deal with in a complex scripting app. Here now is a list of things to keep in mind when dealing with a plethora of scripting references all over your diagram.
- When to Close References - For every single VI Server reference type *except* VI and Application, it's fine to close the reference as soon as you're done with it. I've seen people write scripting VIs before where they thought they needed to keep each "parent" reference open as long as they were using a child reference. This is not the case. Check out this sample diagram, which is getting the first tunnel it finds on a Case Structure and determining if it is an output or an input tunnel:

This code will work, but those wires don't need to span the entire diagram just to be closed later. You can imagine these wires could get very long as the complexity of your scripting code increases. Instead, take an approach like this:
Here, we are closing the references as soon as we're done with them. The diagram looks cleaner, and we don't have to worry about passing really long wires around. Also, note the trick I'm doing with the array of Tunnel references. Often in VI Scripting, you'll have an array of references, but you're only interested in one of those references. In these cases, you can use the Delete From Array function to pull out the one you're interested in, and close all the rest. - Comparing References - If you are trying to compare two references to see if they refer to the same object, you can simply use the Equal? function. Similarly, if you have an array of references, and you want to search that array to find the index of a particular reference, you can use the Search 1D Array function. Even though two references to the same object may have different flattened U32 refnum values (as can pretty easily be seen with the Type Cast function), using the comparison functions in LabVIEW will compare the actual objects those references refer to, and not the numeric refnum values, when performing the comparison.
- Checking Reference Type - Many times you'll have a reference to an object, and you'll want to figure out what type of object it is. You may be inclined to read the Class Name property of that object, but this approach can cause problems. For example, let's say you have a reference to a Node, and you want to see if it that Node is a member of the Structure class (Case Structure, While Loop, For Loop, etc.). So you read the Class Name property of the reference and see if it equals "Structure". Well, this approach will never work, because the Class Name property always returns the most specific class name of the object...so it would return CaseStructure, WhileLoop, ForLoop, etc. Instead of using the Class Name approach, you can use the To More Specific Class function and check the error output:

In this case, as long as the Node is any type of Structure, the class conversion will succeed.


Friday, June 5, 2009
LabVIEW Scripting Tip #2: Supporting Undo
One of the great things about LabVIEW Scripting is that we can implement tools that perform actions in the LabVIEW editor. There are already several utilities posted on LAVA along these lines, along with the hopefully-soon-to-be-released JKI Right-Click Framework. Not to mention current and future shipping LabVIEW features.
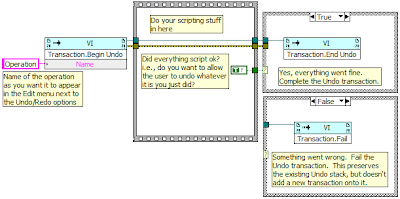
In order to give your scripting-based utility equal footing with built-in LabVIEW features, though, you need to make sure anything you do with scripting can be undone or redone by the user. Thankfully, there is support in scripting for setting up Undo/Redo transactions, as illustrated by this screenshot:
Here are some details on each of the methods shown in the screenshot:
In order to give your scripting-based utility equal footing with built-in LabVIEW features, though, you need to make sure anything you do with scripting can be undone or redone by the user. Thankfully, there is support in scripting for setting up Undo/Redo transactions, as illustrated by this screenshot:

Here are some details on each of the methods shown in the screenshot:
- Transaction.Begin Undo - Call this method before you start your scripting operation. The "Name" input is the text that you want users to see next to the Undo/Redo options in the Edit menu:

After calling Begin Undo, you will do all the scripting code you need to do for whatever editor operation you are performing. While doing your scripting, you need to keep track of a boolean, or some sort of flag, indicating whether or not you actually want to complete the Undo transaction, so you can make a decision between the following two methods. - Transaction.End Undo - Did everything script ok? Assuming you didn't get any errors, and that your scripting code actually did change something on the target VI, you need to end your Undo transaction. This actually commits the scripting action to the target VI, and creates the Edit > Undo option in the menu with the Name you specified on Begin Undo.
- Transaction.Fail - Did an error occur during your scripting? Or did your scripting code not actually change anything? If either of these is the case, you probably want to Fail the transaction. This means that the transaction is not committed to the target VI, and that no new Undo option is added to the Edit menu. Notice that in my screenshot, I do not wire the error up to the Transaction.Fail method. This is because, if an error occurred in my scripting, I still want the Fail method to execute so it cancels the transaction.

Wednesday, June 3, 2009
LabVIEW Scripting Tip #1: The Power of Traverse
This blog post is the first in an as yet unknown number of posts detailing some useful tips I have on LabVIEW Scripting.
If you're ever examining VIs to find objects of a particular type, then you definitely want to check out the following utility VI:
[LabVIEW]\vi.lib\utility\traverseref.llb\TRef Traverse for References.vi
This VI will return references to all the objects of a given class that reside within the panel, diagram, or a user-defined object in a VI. The traversal is recursive, so it will find objects nested within other objects. Here's a simple example that finds all the Case Structures on a diagram:
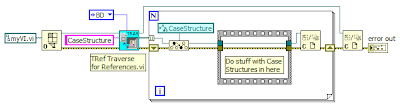
We specify a target of "BD" (for Block Diagram) and a class name of "CaseStructure", and we're good to go. Note that you can also traverse the front panel for objects by specifying a target of "FP". And if you want to traverse a specific object (i.e. find all the clusters that reside within a particular Tab Control on the front panel), then specify a target of "Other" and pass in a reference to the Tab Control to the "Other Refnum" input.
You may wonder why I recommend using this VI, when there is already a scripting property called AllObjects[] for the Diagram class (and a similar property for the panel). Well, that AllObjects[] property does not recurse into container objects. So to completely search a diagram for objects, you would need to get the AllObjects[] property, figure out which objects are containers, separate those objects out, get the container diagrams, do an AllObjects[] on them, etc. etc. This is certainly doable, and I'm guessing people have already written VIs that do this...but in my experience, using the Traverse VI is much, much faster than trying to recurse the entire diagram with AllObjects[].
This traverse VI is used extensively in the VI Analyzer Toolkit, since we are often looking for specific objects on the diagram that we need to examine. And if you know the label of a specific object you are looking for, then you can use the TRef Find Object By Label.vi in that same LLB, which is basically a wrapper for TRef Traverse for References.vi, but it goes an extra step and reads the labels of each found object until it finds the one you were looking for.
Just to give you an idea how useful this VI can be, TRef Traverse for References.vi originally shipped only with the VI Analyzer Toolkit 1.0 when LabVIEW 7.0 released. However, once it got to the point that about a dozen internal groups at NI had asked me for a copy of the Traverse VI so they could ship it with their products, I decided it would be best for all of us if a single copy of the VI shipped with core LabVIEW, which it has since LabVIEW 8.0.
Monday, May 4, 2009
2009 Reasons I Love the New LabVIEW Versioning Scheme
Ok...maybe I don't have *quite* 2009 reasons, but I am a big fan. In case you hadn't heard, the next version of LabVIEW will be LabVIEW 2009. This wasn't a big secret or anything...the new versioning scheme was revealed when we announced the beta. Going forward, each LabVIEW release will simply be versioned based on the year of its release. In no particular order, here's why I like this idea:
- It's immediately obvious how old of a LabVIEW version we're dealing with. As it is now, I can't even remember what year LabVIEW 7.0 released (I just looked it up...2003 apparently).
- We become more consistent with other software out there that is moving toward year-based versioning.
- Most toolkits will also be adopting the year-based versioning. So now we don't have to remember that Report Generation Toolkit 1.1.3 only works with LabVIEW 8.6, or that VI Analyzer Toolkit 1.1 only works with LabVIEW 8.0, 8.2, and 8.5. Going forward, Report Generation Toolkit 2009 will work with LabVIEW 2009, VI Analyzer Toolkit 2010 will work with LabVIEW 2010, etc.
- The internal version of VIs saved in LabVIEW 2009 will be 9.0. So it's pretty convenient that the year '2009' lined up with that.
- This one is minor, but up to this point, we always had a code name for LabVIEW releases in R&D. 8.6 was Saturn, 9.0 is Orion. (Again, not a big secret here...I figure if one of our VPs can talk about the code names, so can I). So when you'd talk to somebody about the release, half the time they'd use the code name, and half the time they'd use the version. Now we'll just be referring to each version by the year of its release...no more code names. Trivia question: Any non-NIers out there know the code names for prior LabVIEW releases?
- We won't be using this versioning scheme for drivers. Again, I think this makes sense, because a lot of drivers release multiple times per year. Plus, I don't think I've seen any other driver developers out there use year based versioning. It appears to be primarily for application software.
- I've noticed that people have interpreted LabVIEW version numbers in very different ways over the years. Some people think "x.0" releases are unstable and won't touch them. They prefer to wait for the much more 'stable' "x.1" release. Other people think "x.0" releases are the only ones that have any worthwhile new features, and the "x.1" releases are only 'minor updates'. Truth is, every LabVIEW release (barring x.y.z maintenance releases) is a major release. I've found must-have features in every LabVIEW version since I started programming LabVIEW. I think year-based versioning will help us all gain a more unified vision of what to expect out of a yearly LabVIEW release.
Thursday, March 19, 2009
Why Are You Still Using Loops in Your Functional Globals?
Are you still creating Functional Globals (a.k.a. LV2-style globals) that look like this?

If you're programming in LabVIEW 8.5 or later, do this instead!

In LabVIEW 8.5, Feedback Nodes gained the ability to live on the top level diagram of a VI... no loop required. This feature gives us the identical functionality of a single-iteration loop with an uninitialized shift register. And let's be honest here...the uninitialized shift register on a single-iteration loop is kind of a hack.
Not only does the Feedback Node clean up our diagrams, but it is slightly faster (sometimes by about 5-10%) than a loop with an uninitialized shift register. This is largely due to the removal of loop overhead.
So get over your Feedback Node (and backwards wire) hangups like I did and make your functional globals more efficient!
Thursday, March 5, 2009
Bulk Creation of Controls and Indicators
In my previous blog post, Jason commented that it would be nice to have a utility that will create controls and indicators on diagram objects in bulk. I thought that was a good idea, and I decided to write a VI that gets us pretty darn close...it's not quite a right-click option, but it's as close as I can get without getting a C-monkey to modify the LabVIEW source code for me, and without having plug-in VIs yet.
So put this VI in [LabVIEW 8.6]\project and restart LabVIEW. You'll now have a Tools > Create Controls and Indicators menu option. Select a few block diagram objects, then choose this menu option. It will create controls and indicators for any terminals of the selected object(s) that aren't already wired to something. This transaction is undoable/redoable as well.
I hope this VI is useful to people. I also had another motive for writing it, but you'll have to wait until my next blog post to find out what that was.
Tuesday, March 3, 2009
A Good Use for Block Diagram Cleanup
One of the big new features of LabVIEW 8.6 is Block Diagram Cleanup, a way to instantly rearrange block diagram contents to make them look "better". In fact, I demoed this feature briefly during my NI Week 2008 keynote appearance. In practice, however, I find that I don't really use the feature all that much. Keeping the diagram clean as I write code has been an integral part of the way I do my job for the past several years, and honestly, if I run Block Diagram Cleanup on my clean code, it makes it considerably less clean. I know many other advanced LabVIEW developers who feel the same way.
Lately though, I have discovered a perfectly valid niche use case for this feature. One of the great things about LabVIEW is how easy it is to write "throw away" code...you know, that simple prototype VI that you write just to test an idea, or that debugging VI that helps you quickly unit test something you're working on...or even the VI where you just drop a single function and wire a few things in to double-check that it works the way you expect (I do this with Match Pattern about once every few months). Well, I tend to write throw away code very quickly, with no regard for "cleanliness". It's these throw away VIs that are the perfect candidates for Block Diagram Cleanup...with a single Ctrl-U, my code becomes considerably more clean than it was before, when I was slinging objects left and right with Quick Drop and reckless abandon. And even though it's throw away code, it's still easier to understand and modify (before I throw it away) if it's clean.
Here's an example "before and after" of one of these situations. In this case, I wanted a VI that displayed every single value in my LabVIEW Class data...in this case, there were several subclasses that contained arrays, so a simple probe wouldn't let me see multiple array elements at once...so I basically wrote a huge "probe" VI that displayed a bunch of these arrays, with several elements expanded. This VI was purely for debugging, and would be of limited utility once I got all my class data straightened out...in other words, it was a "throw away" VI. So I slopped it together, then I cleaned it up. Although not perfect, the cleaned up version is much easier to understand (sorry for all the Wite-Out...these classes pertain to features that have yet to be released):
Before:

After:

I understand that this might be a pretty limited use case, but who knows...maybe I should get my feet wet with the feature now, in the event that it gets a lot better in a future LabVIEW version?
Tuesday, February 24, 2009
My Tools > Options Settings
I've seen many people (myself included) make vocal arguments in favor of their own personal Tools > Options settings. Ultimately though, most of these settings come down to personal taste. Here now, are my personal preferences regarding many frequently-discussed Tools > Options settings, along with an occasional anecdote. Keep in mind that you can simply copy your LabVIEW.ini file from one LabVIEW installation to another to preserve these settings (so you don't have to go through and check/uncheck a bunch of options with every new LabVIEW install):
- Front Panel: Connector pane terminals default to Required: CHECKED - I really love this option, which was added in LabVIEW 8.5. There were so many times in the past when I was working on an app, and I'd add inputs to a subVI but forget to wire them up in the calling VI, then spend several minutes debugging before I figured out what I'd done. Also, this option is smart enough to ignore error input terminals, leaving them as Recommended.
- Block Diagram: Enable automatic error handling in new VIs: UNCHECKED - I understand that this option exists for the benefit of new LabVIEW users, but for the rest of us, it's just WRONG.
- Block Diagram: Enable automatic wire routing: UNCHECKED - I've tried this option a few times, but I think my manual routing of wires produces much cleaner diagrams.
- Block Diagram: Enable auto wiring: CHECKED - I remember when I worked in the AE department and hadn't yet joined LabVIEW R&D, I attended a "demo day" on the LabVIEW floor where all the LabVIEW developers were showing off the features they were working on. When I saw this one (called "wire kissing" at the time), I thought it was way cool. And I've been a fan ever since, especially for automatically wiring error clusters. Note that when you drop objects with Super Quick Drop, auto wiring does not occur...but it's a small price to pay in order to be able to code at lightning speed...
- Front Panel/Block Diagram: Labels snap to preset positions on terminals: CHECKED - Another one of my favorites...this one was under my radar until it just appeared one day in a build of LabVIEW 8.0. My boss is a bigtime pixel-counter, so it was nice to have a really quick way to drag a label into the correct spot.
- Block Diagram: Place front panel terminals as icons: UNCHECKED - In LabVIEW R&D there is one extremely fierce advocate of keeping this feature checked by default. He shall remain nameless. If he wasn't around, though, we probably would have changed this option long ago (I'd personally prefer that we just remove it altogether). Looking at the big picture, though, it's probably worth having this option checked by default and keeping this guy around. :)
- Block Diagram: Place structures with Auto Grow enabled: UNCHECKED - I take pride in the way my diagrams look, and I like having 100% control over how they look. The thought of dropping a function in a nested structure, and having a bunch of crap all over the diagram move around as a result...it's a little too much for me to take.
- Block Diagram: Show red Xs on broken wires: UNCHECKED - Originally this feature did not have an entry in Tools > Options...you either lived with it, or found out what the INI token was to disable it. I hated the feature so much, I demanded a Tools > Options checkbox. What I didn't know was that, at the time (LabVIEW 7.0), the Block Diagram page in Tools > Options was completely full, and required a complete reorganization to fit in this new option. You should have seen the sad look on the unnamed developer's face (yes, the same one who likes terminal icons) when he realized that he was going to have to add my option. For those of you who hate red Xs, you're welcome.
- Block Diagram: Show dots at wire junctions: UNCHECKED - I just think they're ugly.
- Block Diagram: Show constant folding of wires/structures: UNCHECKED - The fuzzy wires make my eyes hurt. And I never really saw any benefit to knowing when constant folding is taking place. Seemed like more of a novelty than a utility.
- Block Diagram: Auto-insert Feedback Node in cycles: UNCHECKED - Don't get me wrong, I really like Feedback Nodes as a replacement for Functional Globals. But every once in a while I'd be wiring up some stuff in a loop, and connecting wires to each other while re-wiring things, and somehow my broken wires would turn into Feedback Nodes, and that freaked me out. So now I only get Feedback Nodes if I explicitly drop them myself.
- Alignment Grid: Everything: UNCHECKED - I don't like the grid. It makes things look too noisy.
- Controls/Functions Palettes: Palette Loading: LOAD PALETTES DURING LAUNCH - As you hopefully know by now, this enables Quick Drop to be instantly usable on its first use, at the expense of a slightly longer LabVIEW launch time.
- Environment: Maximum undo steps per VI: 99 - I've never seen any performance problems with cranking up this setting.
- Environment: Skip Getting Started window on launch: CHECKED - Since my LabVIEW launch time is a little longer for Quick Drop, I figure I can save a second or so if I don't have to load the GSW...I never really used it for anything special that I couldn't access from a new VI's File menu.
- Environment: Lock automatic tool selection: UNCHECKED - I'm a big fan of the Auto Tool, but I do like being able to press Tab, like the good ol' days, if I really need to.
Wednesday, January 28, 2009
LabVIEW Certification: Preparing for the CLD
After I passed the CLAD, I decided to try the Certified LabVIEW Developer (CLD) exam. According to the CLD webpage, the purpose of this exam is to "demonstrate experience in developing, debugging, and deploying medium to large LabVIEW applications."
To prepare for the CLD, I first watched the CLD webcast to get a good summary of what to expect on the exam. It turns out the material in the CLD webcast was very similar to the material in the CLD Exam Preparation Guide, but I still read through the entire document to make sure I was familiar with all the areas of competence associated with the exam.
I spent the bulk of my preparation time working through all of the sample exams that were available. My main purpose in working through the sample exams in their entirety was to ensure I wouldn't have any issues with the 4-hour time limit of the CLD. Thankfully, I completed the sample exams and the actual CLD with plenty of time to spare. I strongly recommend that anyone planning to take the CLD work through all the sample exams, not only to assess your coding time, but also because the sample exams are very similar in nature to the actual CLD.
Many people have posted CLD suggestions and tips on the NI Forums and the LAVA Forums. A search of "CLD preparation", or simply just "CLD", will probably yield some useful results. Here's a list of what I feel are the most important points to know before going in for the CLD:
- I can't stress enough the importance of taking all the sample exams and timing yourself. If you're unsure about your programming, post your resulting app to the NI or LAVA forums and ask for some general "How did I do?" feedback.
- When the exam begins, spend a few minutes customizing the LabVIEW environment to match your typical setup. For me, this included things like adding my most common Quick Drop shortcuts, turning off structure auto-grow and red Xs on broken wires, etc. (check out this blog post where I talk about my favorite Tools > Options settings). You'll make up those few minutes many times over during the exam when you're not continually slowed down by environment settings with which you're not familiar.
- Documentation is a huge part of your CLD score, and it is one of the easiest areas to maximize points. Set a description and tip on every front panel control and indicator. Set a VI description on every VI you write. If you use the LabVIEW Project, set a description on all non-VI items in your project (like .lvlibs). Place comments *everywhere* in your diagram, describing your functionality in a concise way. Make sure to document the diagrams in different cases and loops. It is also a good idea to label long wires and wires associated with shift registers.
- Make sure your application is functional before submitting it. It's probably not a bad idea to save all your VIs and close everything down once you're done, quit LabVIEW, restart LabVIEW, open your VI, and make sure it runs correctly. This will eliminate the possibility that you've got non-default values in controls that won't persist after a restart, or that you've got changes to VIs in memory that aren't committed to disk, etc.
- For the CLD, the functionality of your application should trump the complexity of any architectures you select. If you think you can control your CLD app with a simple state machine, and that's a programming structure you're comfortable with, then use a simple state machine. Don't choose an overly complicated architecture if you're not comfortable using it.
- Make typedefs out of any clusters or enums you create for your applications.
- Create a non-default icon for every VI you write (I'd recommend this for .ctls and .lvlibs as well, although that's a pretty low priority). Simple black border, white background, black text icons should be fine. Don't waste time drawing pictures of DAQ boards or librarians in your icons.
- Write clean code. You can lose points for bad style.
- If you're running short on time, prioritize your remaining work, placing "functional application" at the top, and things like "tip strips on subVI controls" at the bottom.
Monday, January 19, 2009
My Weekly Nuggets are Back!
I decided to start writing weekly nuggets again. Check out the first 2009 nugget here. Enjoy!
Edit: A little background on my weekly nuggets. Back in January 2006 I decided to start posting a LabVIEW tip or trick every week on the NI Discussion Forums...this was the first installment. I kept it up for about a year, then announced my retirement, since it was getting pretty hard to come up with a new tip every week for 52 straight weeks. Anyway, after I found out that people were bummed that my nuggets stopped, I started posting "occasional" nuggets...much less frequently than weekly. Now that it's 2009, I decided that, to celebrate my 10-year anniversary at NI, I'd start posting weekly nuggets again. Let's see how long I can keep it going!
Edit: A little background on my weekly nuggets. Back in January 2006 I decided to start posting a LabVIEW tip or trick every week on the NI Discussion Forums...this was the first installment. I kept it up for about a year, then announced my retirement, since it was getting pretty hard to come up with a new tip every week for 52 straight weeks. Anyway, after I found out that people were bummed that my nuggets stopped, I started posting "occasional" nuggets...much less frequently than weekly. Now that it's 2009, I decided that, to celebrate my 10-year anniversary at NI, I'd start posting weekly nuggets again. Let's see how long I can keep it going!
Tuesday, January 13, 2009
LabVIEW Certification: Preparing for the CLAD
The road to LabVIEW Certification starts with the Certified LabVIEW Associate Developer (CLAD) exam. According to the CLAD webpage, the purpose of this exam is to demonstrate that the test taker has "basic proficiency" using LabVIEW. Since I've been writing LabVIEW code as my full-time job for over seven years now, I figured my work experience sufficiently prepared me for the CLAD. I recommend taking the sample exams available at the CLAD webpage above to make sure you are familiar with what kinds of questions to expect on the exam.
For me, the actual CLAD ended up being very similar to the practice exams, and I finished it very quickly (I think I was done with the 40 questions in about 15 minutes). If you have been writing LabVIEW code for several years, I doubt you'll need to do much preparation for this one. If you think you'll need more prep, I recommend watching the CLAD webcast and carefully studying the preparation materials. Both the webcast and the prep materials are available at the CLAD webpage linked above.
Additionally, there have been several threads on both the NI Forums and the LAVA Forums over the years that discuss the CLAD. Some threads have more general discussions, while others are specific to questions on the sample exams. Searching these forums for the term "CLAD" should get you to most of these threads.
Friday, January 9, 2009
"Artisan" Sounds a Lot Like "Architect"
I just found out today that I passed the CLA exam! Ever since I found out after NI Week 2008 that NI employees could receive NI Certification, I signed up in a hurry...first for the CLAD, then the CLD, then the CLA.
Look for some posts in the coming weeks about how I prepared for each exam.
Look for some posts in the coming weeks about how I prepared for each exam.
Don't Like It When Quick Drop is "Populating...Please Wait"?
I wrote an occasional nugget a few months ago with some advanced Quick Drop tips. Apparently word hasn't gotten around yet, because people still sometimes ask me if there's any way to avoid the initial "Populating...Please Wait" message the very first time Quick Drop is used after starting LabVIEW.
So to reiterate, if you go to Tools > Options > Controls/Functions Palettes and choose Load palettes during launch, your LabVIEW launch time will increase by a few seconds, but Quick Drop will be immediately ready the first time you use it.
Spread the word!
So to reiterate, if you go to Tools > Options > Controls/Functions Palettes and choose Load palettes during launch, your LabVIEW launch time will increase by a few seconds, but Quick Drop will be immediately ready the first time you use it.
Spread the word!
Subscribe to:
Posts (Atom)